Thursday, July 29, 2010

Panasonic Announces Interchangeable 3D Camera Lens

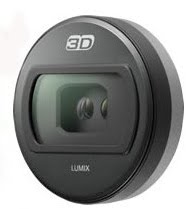
Panasonic's new 3D lens

By the end of the year, it may be possible to put some added "depth" to your photos thanks to a new lens by Panasonic that will allow the camera to record in 3D.

The lens in question is for Panasonic's Micro Four Thirds system. Unfortunately, exact specifications (focal length, f ratio, etc.) were not given, but what was stated was how the lens would work and a picture was released, too.

Unlike traditional SLR lenses, this new model from Panasonic has twin optics. Each lens sends an image through to the camera's sensor, where it is recorded. By using supplied image processing software, users then can manipulate the data into a 3D still image, which then can be projected in full 3D effect via one of Panasonic's Viera 3D television models.

Previously, 3D photography required two separate lens/sensor systems for a single camera or an expensive panorama setup. Now, with Panasonic's new, interchangeable 3D lens, photographers the world over can make quick and easy 3D images on the go and still retain all the versatility of a SLR system. Panasonic is already predicting a hit, with senior manager Darin Pepple stating that 2010 will be the "first year of the 3D era."

Well, that in itself may be a stretch, but affordable 3D imaging is, without doubt, just over the horizon, as 3D point and shoot cameras are already on the market. The real test will come when the new Panasonic lens starts finding its way onto cameras.

In the past, Panasonic has been an innovator, pioneering the mirrorless Micro Four Thirds system, which retains the interchangeable lenses and size of a SLR sensor but eliminates the mirror, allowing for a large reduction in size, especially depth. Already, Olympus, Samsung, and Sony have copied this concept for their own cameras.

Back to the lens, no specific release date was announced, nor was an estimated price, either.

For the full story:
Panasonic Press Release


Humble requests:

If you found this informative (or at least entertaining), help me pay my bills and check out my Examiner pages for photography and astronomy for more great stuff.

Think this was cool? Why not tell a friend?

For something even better, become a follower.

Wednesday, July 21, 2010

Last Roll Of Kodachrome Developed

Kodachrome 64: the end of an era

Last year, Kodak announced that it was ending the production of its Kodachrome film, the longest continually produced color film in the world. Just last week, it was discovered that the last roll of Kodachrome ever produced was just developed.

For a brief history, Kodachrome was invented in the early 30s by musicians Leopold Godowsky Jr. and Leopold Mannes. The film was first sold as a 16mm film for movie cameras. However, because of its popularity with movie shooters, the film quickly transitioned to still camera film, where it remained a staple in the photographic industry for 75 years. Other formats included 35mm, 120, 110, 4x5, and 8mm movie.

Unfortunately, as good as it was, not even Kodachrome was forever.

By the 1990s, the competition was on the rise, especially from Fujifilm's Velvia line. Profits sinking, within the decade, Kodak would start chopping many lines of its Kodachrome lines of film. By the year 2000, about half of the Kodachrome films, both still and movie, were a thing of the past. With production slowing, Kodachrome processing labs started going out of business, which hastened the end for the legendary film as it became harder and harder for photographers to get their film processed.

By 2005, only the Type A 16mm movie film, 35mm Kodachrome 64, and 35mm Kodachrome 200 remained in production.

With the advent of digital video cameras, the movie film was first to go, discontinued in 2006. Next to go would be the Kodachrome 200 for 35mm cameras, which was axed in 2007. With these cuts, only two varieties of Kodachrome 64 remained, the 35mm regular and professional. Then, on June 22, 2009, Kodak made the final cut, announcing that production of Kodachrome 64 would end.

As of now, there is only one Kodachrome processing lab left, Dwayne's Photo, which is located in Kansas. Now, in July 2010, the final curtain for Kodachrome is about to fall as Dwayne's Photo announced that it will only process Kodachrome through this year, which means that, if you bought some of the last Kodachrome film ever produced, get shooting while you can still get your film developed.


Humble requests:

If you found this informative (or at least entertaining), check out my Examiner pages on photography and astronomy for more great stuff (and help me pay my bills, too!)

Thought this was interesting? Why not tell a friend?

For something even better, become a follower.

Friday, July 16, 2010

June 2010 Astrophotography

Here are June's astrophotos. Not much in terms of quantity, but more than adequate in terms of quality. The bad news is that June was pretty much a cloud-out in the thin, fickle type. Clear one minute, cloudy the next, no time for an all-night shoot. The good news was that it was clear for two bg events: the Lagoon Nebula-Ceres transit (2 of 3 here) and the start of a lunar eclipse.

In terms of quantity, July is so far looking to be a lot better for deep sky.

Enjoy these in the meantime.


Ceres on June 2.
Ceres on June 4.


Sunbeams at dawn.


M92, the last of the great spring globulars (M13, 5, and 3 are the others).


Start of a lunar eclipse, note how the top of the Moon is darker than the bottom.


Gibbeous Moon


Sun pillar at dusk.


Double rainbow at dusk


Humble requests:

If you found this informative (or at least entertaining), help me pay my bills and check out my Examiner pages for photography and astronomy for more great stuff.

Thought this was cool? Why not tell your friends?

For something even better, become a follower.

Tuesday, July 13, 2010

Fixing Incorrect White Balance In A Few Clicks

For me, the number 1 reason RAW rules is the fact that white balance settings no longer matter. Because the data recorded to the memory card in RAW is just that, raw data, it gives one room to do extra processing that could not be done with an in-camera processed JPEG file. With RAW, just aim, shoot, and fix the white balance later if need be.

Unfortunately, many low-end point and shoot cameras do not offer the RAW option.
The good news is that most cameras work well when set to auto white balance. For natural lighting, the difference between "sunny," "cloudy," "shadow," and "auto" is so minimal that one has to actually look for differences to spot them in most cases. The bad news is that, under artificial lighting, the auto white balance setting ceases to work so well.

Fluorescent lighting is a mixed bag, some cameras do pretty well while others don't do so hot. However, the real Achilles heel of digital cameras is their performance under incandescent/tungsten lighting. To put it plainly, every camera I've ever used (Canon, Nikon, Sony, Olympus) has performed terrible (that's probably too kind a word, but this website is intended to be friendly for all ages) under incandescent lighting. This one fact requires manually setting the white balance from "auto" to "tungsten" when one could leave it alone at all other times.

Enter the problems.

Okay, you're shooting indoors under incandescent lighting one evening. You take the pictures, they look great as you remembered to set the white balance manually, then you go to bed. You get up the next morning and find an eagle sitting in your tree. Quickly, you grab the camera, race to the window, and start snapping before he flies away. The eagle flies away and you decide to review your pictures. Upon review, all of the pictures have an overpowering blue cast to them and look nothing like the scenes you just saw.

Oh #*%^!

Never fear, there is a way to recover your incorrect white balance JPEG images!

All digital cameras (except those picked up at garage sales) come with basic image editing software that allows for the most basic of operations, which typically includes color cast. So, upload your blue pictures and then drop them into your editing software. What follows is a general how-to guide using Photoshop Elements. Your software will probably be different, but the idea remains the same in that the key is changing (sometimes repeatedly) the color cast.

The original image and probably the worst example of a mis-set white balance image that I've shot! Pay attention to the street, there was a definate bluish cast to this morning (hey, I live in Northern Ohio and see snow all the time, so something had to be special!)
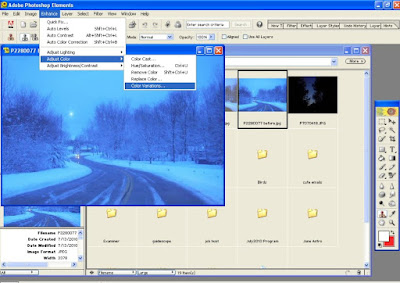
First, opening Elements, go to "enhance" and then to "adjust color." From there, another bar opens to the side, choose "color variations."
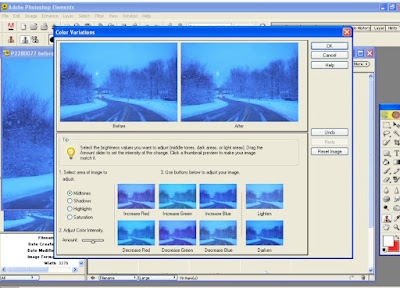
A new window pops up, with the ability to increase/decrease red, green, blue, and brightness.
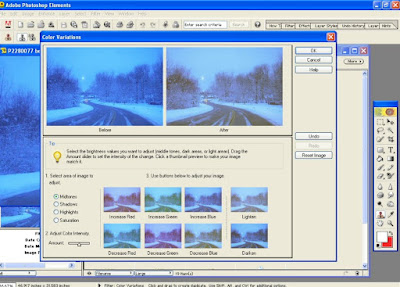
Next (the important part), you adjust your colors. In Elements, this is done with a side-by-side before and after preview screen. Start clicking colors to see your picture change in real time. To fix the white balance, click to reduce blue and add red. Depending on the severity of your incorrect color cast, you may need to reduce blue multiple times. Once you're satisfied with the image, save it.
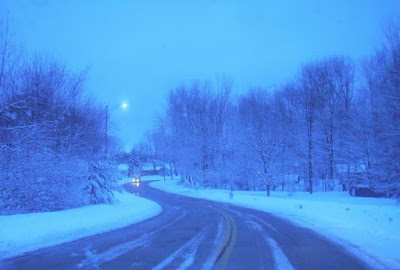
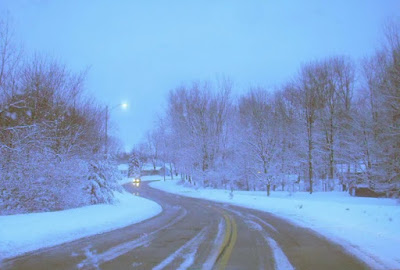
Done, what a difference a few clicks make! (yes, this was a blue morning like this). Again, comapre the street color to that in the original.


Humble requests:

If you found this informative (or at least entertaining), help me pay my bills and check out my Examiner pages for photography and astronomy for more great stuff.

Don't forget to pass this link along, either.

For something even better, become a follower.

Friday, July 9, 2010

"Macro" Photography With A Point And Shoot Camera

Macro photography: extreme close-up shooting that one normally associates with freakishly expensive SLR lenses, fancy lighting rigs, and tiny tripods. In the past, this was the only way to do macro. Today however, things could not be more different.

Many (all but the cheapest) point and shoot digital cameras of today offer a macro mode, which is normally represented by a flower icon. To make things better, most cameras have the macro on/off function as an external button! Yay! Buttons rule! In this macro mode, the camera plays with its lens focus mechanism to allow for super close focus that would be disabled in regular mode. With the ability to focus up close, often aggressive in-camera sharpening, and good light, today's point and shoot cams can make some jaw-dropping photos that will have people exclaiming (as they look at your camera) "you took that picture with that thing!?"

Yes, it can be this good.

With every fine detail mattering in macro photography, especially considering the pixel packed sensors of a P&S camera, good light is vital as it allows one to shoot at base (or near) ISO. At these low sensitivities (I'd avoid anything over 200), a P&S can produce an image that is every bit as good as a dSLR. Unfortunately, even on sunny days, one thing can hinder macro photography: you.

Yes, you are can be your own worst enemy when it comes to shooting macro with the ISO sensitive P&S camera. By having to get close to the subject, you will often block your own light, thus negating your ability to shoot at base ISO. Not good! Instead, if it is absolutely impossible to get out of the way and preserve your desired shooting angle, a small mirror or white piece of paper can be a real picture saver via reflecting light onto your subject once again. real plus of reflected light coming in from the side is that it can amplify any texture on the subject and provide nice contrasts.

Lighting situation conquered, it's time for focus.

P&S cameras focus for macro in two ways: close and then out and out and then in. Generally, the first method is better for macro as the camera automatically focuses at minimum focus distance and then compensates out as needed. By going about focus in this manner, speed and accuracy are both generally better. However, if your camera must focus down from far away even in macro, don't be completely discouraged. Flowers aren't going anywhere nor are any other stationary objects. Bugs may run/fly away but, chances are, if they were easily spooked they wouldn't let you get so close as to think about macro photography in the first place! If you can get to within a foot of an insect, chances are, it's in no hurry to get put of the area.

Whichever way your camera works, getting accurate focus is the biggest challenge to macro photography. To aid in the focus, aim for places of high contrast, such as the edge of a flower petal. With two high contrast objects in the viewfinder, the camera is more likely to find focus correctly.

One last thing about focus, some cameras have an automatic focus for macro mode that doesn't even require you to press the shutter button! This can be a point of controversy. For people used to half pressing the button to focus, the self-operating AF can take some practice to get used to. The good news is that it will get the camera in focus almost instantly due to its continual operation.

The two big hurdles, light and focus addressed, it's pretty much just point and shoot from here as many of today's P&S cameras don't allow for much manual anything anymore. If you are lucky and your camera does allow for manual control, feel free to start playing around with things in your house/yard so that you know what's best when you're out and about. Either way, macro photography with a little pocket P&S can be a lot of fun and rather rewarding once you upload the images to your computer.

Below are a series of images that were all taken with a point and shoot cameras, the Nikon Coolpix s550 and Olympus Stylus 550WP. I must say, while P&S cameras are not my normal cup of tea , this these can be a lot of fun for close-up on the go!

Note: images are resized full shots while second are extremely huge crops. Note where I pulled the crop from against the real picture for scale. Not cropped so heavily, most ofthese photos would make great 8x10" prints.


Postage Stamp


Dollar Bill


Mayfly (aka Canadian Soldier in Northern Ohio)


Model Car, ('66 Olds 442)


An annoying insect


Flower up close


Compact Flash Memory Card


Flower (seriously, I wish I'd wrote down what they were)


#2 Pencil


Hey, be different! Do macro with your P&S!


Like What You Just Read?


Why not check out other great stuff about photography, astronomy, associated gear, and how to use it.

Think someone else would find this informative (or at least entertaining)? Use the buttons below to share!

Tuesday, July 6, 2010

Third Party, First Rate

Tokina's new 16-28mm f2.8 lens

I just knew this would happen: Tokina, the last of the traditional technology-only lens makers would join the modern world this year. Now, with an announcement this morning, Tokina has done just that in a big way!

Digital Photography Review broke the story. Tokina has released a 35mm/full frame capable 16-28mm f2.8 zoom with a sonic drive and weather sealing. With this release, Tokina becomes the last of the Big 3 third party manufacturers (Sigma and Tamron are the others) to add a sonic drive on a lens and the first to add weather sealing (which nicely keeps with a company known for its tough build quality). If the past is an indication of the future, this lens should be a gem as Tokina's digital-only ultrawides (11-16mm f2.8 and 12-24mm f4 (I and II versions) are both superb optics.

This is great news, especially for me, as I'm crazy (own a 28-70 2.8, 80-200 2.8, 100 macro 2.8) about Tokina products!

The lens will be available in Nikon and Canon versions and is set to ship in August and September, respectively at a MSRP of $1,400. However, I foresee a $800-$1000 street price.

So what does this mean for the future? I can foresee further fullframe capable Tokina products of such quality in the future. Currently, Tokina makes no standard or fast telephoto zooms for full frame. With the long-time Canon monopoly on FF dead, expect Tokina to start getting back into the 35mm/FF game as there are, once again, profits to be made. What do I expect to see? How about sonically driven, weather sealed 24/28-70mm f2.8 and 70/80-200mm f2.8 lenses.

Only time will tell.


Humble requests:

If you found this informative (or at least entertaining), check out my Examiner pages for photography and astronomy for more great stuff. By doing this, you are helping me pay the bills, which I am grateful for.

Don't forget to pass this link along, either.

For something even better, become a follower.

Saturday, July 3, 2010

Back From "Vacation"

More Work
Yes, this is the first post in nearly two weeks time when things had been coming pretty much every other day up to that point for a few months. So what gives? This is what, I just got a second column on Examiner having to do with, guess what, astronomy. So please, check it out and help me pay my bills. This new column is the main reason nothing has shown up here for awhile.

A New Direction?
With the new Examiner column, things may change a bit here. The photos and reviews will keep coming, but the observing guides, events, and general news may slow down a bit as these types of things will be going to Examiner instead. However, there's a good chance that meatier versions of some of the things poste there may show up here, though.

Back To The Old Stuff
Don't worry, the already mentioned P&S macro article will be coming soon as will the June astrophotos, which will feature a meeting of Ceres and the Lagoon Nebula.


Humble requests:


If you found this informative (or at least entertaining), don't forget to check out my Photography Examiner page for more great stuff. By doing this, you are helping me pay the bills, which I am grateful for.

Don't forget to pass this link along, either.

For something even better, become a follower.