Tuesday, November 30, 2010

In-Depth Review: Tokina 80-200 f2.8 AT-X

in depth review Tokina 80-200 f2.8 AT-X lens
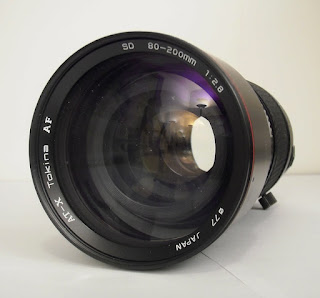
The Tokina 80-200 f2.8 AT-X lens


Tech Specs
Focal Length: 80-200mm
Dimensions: 7.5” x 3.3”
Weight: 3ibs.
Maximum Aperture: f2.8
Minimum Aperture: f32
Diaphragm Blades: 9
Front Element: Rotates, extends about half an inch
Autofucus Mechanism: Micromotor (Canon version)
Closest Focus: 4.9 feet
Filter Size: 77mm

Background
Ever since as ascension of the zoom lens as a legitimate photographic tool in the late 1980s, constant f2.8 lenses in the 70/80-200 range have been extremely popular among both professionals and amateurs. Why? Simple: reach and speed make for a handy lens. As a result, everyone who makes lenses produces such optics, both manufacturer and third-party. To meet this need, Tokina started producing fast 80-200s almost as soon as AF became the norm. The lens reviewed here is the original AF 80-200, which commenced production in late 1980s.

Build Quality: 5
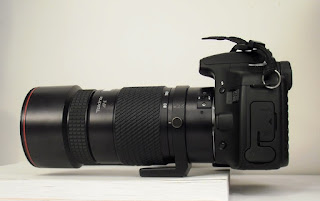
Tokina is a company known for its high standards of construction and the 80-200 f2.8 AT-X doesn't disappoint here, putting all lenses except the top of the line manufacturer versions to shame in a big way. Made out of solid metal, this lens is built like a tank and, weighing in at around 3 pounds, feels like one, too. With both its size and weight, this thing could legitimately be used as a weapon! Moving into the mechanics, it's a mixed bag. The zoom ring is absolutely buttery smooth without being loose and feels as though it's floating on air. One finger zooming with this lens is easy. As for the focus ring, well, it isn't a ring at all, but the inner barrel of the lens that is textured to look and feel like a ring. When it comes to focusing, the lens will extend about half an inch when focused at its closest distance. In terms of movement, the focus “ring” is a bit sloppy (at least on my lens). However, this being an old lens, this could also be from 20+ years of wear, too. Being in the first generation of Tokina AF lenses, this 80-200 doesn't incorporate the famous Tokina AF/MF clutch mechanism of the later version. However, as a whole, the positives of the solid metal construction and internal zoom trump the cheapish manual focusing mechanism.


The lens is built like, and weighs in like a tank too! Note the tripod collar: it rotates, but you can't take it off.


Autofocus Operation: 2
Being vintage 80s, the Tokina 80-200 f2.8 AT-X does not feature an ultrasonic drive, but a micromotor/mechanical drive, depending on your make. In terms of accuracy, the Tokina is good so long as the subject isn't moving fast and the lighting is reasonable. In fact, it's dead on in these situations 100% of the time for me on my Canon 30D. Unfortunately, the speed and tracking abilities of this lens leave a lot to be desired. To put it plainly, this is no sports/wildlife lens unless you'll be shooting golf and/or turtle races! In practice, I find that I only get about a 25% keeper rate with this lens when birding with it, not good. I'm just thankful that I'm shooting digital and not blowing wads of money with film and the cost of getting it developed! In terms of sound, the lens it pretty loud, but still nowhere near as loud as the slap of the SLR's mirror.

NOTE: the successor of this lens, the 80-200 f2.8 AT-X PRO (with the AF/MF clutch and internal focusing) is said to be a lot faster in terms of AF.


 The focus ring isn't a ring and the lens extends a lot when focusing up close.


Optics: 3
Since there is so much to a zoom lens, it was only fair to test the Tokina 80-200 AT-X throughout the focal range. For this test, I used the focal length settings that are marked on the lensd, testing from wide-open f2.8 to f8.

Sharpness, a contest of tank vs. brick wall: which one wins?

Sharpness

Lens at 80mm
At its widest focal length setting, the Tokina 80-200 f2.8 AT-X performs quite well, especially considering its age. Wide open, the images are very sharp right from f2.8 . In terms of corner to corner sharpness, the entire field is good, with only minimal sharpness falloff in the corners, which in itself is eliminated by stopping down to f4.

Lens at 100mm
See the 80mm analysis, as the lens is identical in most regards except that the corners are sharper wide open at f2.8, no need to stop down here.


Lens at 140mm
Come the middle of the focal range, the lens starts to soften up a bit. Wide open, I personally wouldn't consider the result usable, thought it may be to people who don't have a problem applying a lot of sharpening in post-processing. No, it's not awful, but it sure isn't good, either. The good news is that, stopped down to f4, things improve a lot. Corner to corner sharpness is still consistent at all apertures.


Lens at 200mm
Fortunately, the lens has gotten over some of its issues by the end of the focal range. At 200mm, sharpness improves a bit, but it still isn't as good as it was at the 80/100mm settings. Corner to corner performance is still good here, too. In fact, I'd rate extreme corner performance at 200mm as better than it was at 140mm. Unfortunately, to get optimal sharpness, one has to stop down to f5.6 as f4 no longer gets the job done at the longest focal setting.


Pincushion distortion appears at 200mm

Distortion
Being a modest 2.5x zoom lens, the Tokina 80-200 f2.8 AT-X has a minimal amount of pincushion distortion at 200mm. Other than that, straight lines were straight at the other tested focal lengths.


Vignetting
On the sub-frame Canon 30D, there is obvious vignetting across the focal range when the lens is wide open, which is somewhat disappointing when considering the fact that this lens was built for 35mm film cameras. The good news is that, by f4, the shading disappears. Unfortunately, not owning a FF dSLR (or wanting to waste film shooting the sky), I can't tell you what it would do here. Note: color removed, contrast booted to exaggerate vignetting patterns.


CA can be quite disturbing in extreme contrast situations in bright light (80mm top, 200mm bottom)

Chromatic Aberration
In terms of chromatic aberration, this is probably the weakest link in the optical chain that is the Tokina 80-200 f2.8 AT-X. The good news is that the performance can vary but, in the most extreme situations, like a white fence on a sunny day (see below) the amount of CA is truly disturbing, being easily visible before the image is even blown up. In terms of where the lens is worst, this is on the wide end, with CA not disappearing until about f8. On the long end, the CA is still there, but nowhere near as insidious. Expect to do some post-processing work to vanquish the violet when shooting on a sunny day. Under cloudy conditions, CA is pretty much a non-issue, as the second set of shots showcase.

CA is less obnoxious in cloudy weather (80mm top, 200mm bottom)


Here's a full shot to show just how heavy the crops are.

Flare/Ghosts
When it comes with the ability to resist flare/ghosts, the Tokina 80-200 f2.8 AT-X is good. One has to literally try and get it to flare/ghost for it to do so. My advice, don't be like I was below and keep the Sun/bright point sources of light out of the corner of the frame and you'll be fine. I'm sure a hood would make things better but the lens I bought didn't come with one.


Value: 3
Typically, constant f2.8 short telephoto zoom lenses will cost at least $700 for third-party products and up to around $2,500 for name brand glass. On the used market, the Tokina 80-200 f2.8 AT-X typically sells around $300, with the 'PRO' successor going for more. Well, what can I say? It's a $300 f2.8 telephoto zoom, so it's hard to say it's a bad deal but on the other hand, don't go expecting magic as just about anything in this category will be better, albeit pricier. However, I would still rate this lens as better than the dime a dozen, $200, f4-5.6 75-300s out there as, at least with this lens, you have the option of stopping down to improve image quality and still maintain decent shutter speeds.


In the Field:
While short, constant f2.8 telephoto zooms are among the most useful optics out there for photographers who don't need faster glass, the fact that the autofocus on the Tokina 80-200 AT-X is so bad severely limits the photographic applications for this lens. Normally, such lenses are the bread and butter of action/low light shooters. Unfortunately, this lens is crippled in these situations, so what is it good for? Well, how about casual snaps? Yes, this lens can produce some great photos when the AF mechanism operates in its comfort zone of slow/stationary subjects and good light. For even better photos, stop down to f4 or, if light allows, f5.6 to slightly sharpen up the resolution and kill a bit of the chromatic aberration. Oh yes, did I mention that this 3 pound, solid metal beast could double as a weapon?

NOTE: Yes, there are no real life pictures withthis lens just yet, but I'll be sure to dig up some in the coming days. For someone who does mainly wide-angle and macro stuff, this focal length lens does not spend a lot of time on the camera.


Astrophotography
The Tokina 80-200 AT-X is a great lens for astrophotographere because, even on digital cameras, infinity is infinity, which means no need to fiddle with focus, pulling it back just a touch from infinity to get sharp stars. With this lens, disable the AF, focus to infinity, and forget about it!
For crisp astrophotos, focus to infinity and forget it. Yay!


Competition:
Now that zooms are seen as legitimate photographic tools and not gimmicky toys for casual snappers too lazy to walk around to frame a photo, the short, fast telephoto, after the fast standard zoom, probably competes in the tightest market for photographic lenses as everyone makes such optics. As for the competition in regards to the Tokina 80-200 f2.8 AT-X, everyone makes such a lens/a crop cam equivalent for one. In all, the only places where the old Tokina comes out on top is price (but you get what you pay for, remember, this is a $300 lens!) and with a tie in build quality for some of the current models. In terms of optics and autofocus, the old 80-200 Tokina will undoubtedly get blown away. Given the choice of this or the Canon 70-200 2.8L IS that I rented awhile back, the choice is clear. However, for bargain shooters who want fast glass and can live with some shortcomings, this could be just the lens for you.


Conclusion: 3.25/5
In conclusion, there isn't a lot of middle ground on the Tokina 80-200 f2.8 AT-X lens. Build quality is on par with the top-grade manufacturer lenses in this class, which often cost at least 4 times as much. Another plus is the distortion and tendency to flare (or lack thereof), lastly, image sharpness from corner to corner shows little falloff. On the bad side is the terrible chromatic aberration and autofocus capabilities, especially regarding speed and low-light performance. In the so-so area are the optics, with the wide end not being good until a stop down at f4. In all, bad + good = average, which is what this lens is considering all of its drastic self-contradictions. Recommendation? A 'yes' if you're on a budget and must have fast glass and a 'no' if focusing speed and overall image quality wide open (especially on the long end) are top concerns.

The Tokina 80-200 f2.8 AT-X: a lot of glass for only a little cash!


Tokina Fan? Check Out These Reviews!
Tokina 100 f2.8 ATX-PRO Macro
Tokina 80-400 f4-5.6 AT-X
Tokina 17 f3.5 ATX-PRO
Tokina 28-70 f2.6-2.8 ATX-PRO


Like What You Just Read?

Why not check out other great stuff about photography, astronomy, associated gear, and how to use it.

Think someone else would find this informative (or at least entertaining)? Use the buttons below to share!

Wednesday, November 24, 2010

Image Quality Showdown: RAW vs. JPEG and P&S vs dSLR

For normally civil people who also happen to be photographers, few topics can bring up a firestorm of controversy as the whole RAW vs. JPEG debate and the question of whether point and shoot cams are good for anything at all. Want proof? Just go to online photography forums, read away and get some laughs out of the sometimes overly impassioned arguments. However, if one really wants to see if there is a RAW advantage or whether P&S cams can take good pictures, there needs to be hard, photographic evidence that say one way or the other. Providing such evidence is what the following tests are all about.


The painting used for the test shots


Round 1: RAW vs. JPEG.
While there are some undeniable advantages to the RAW format that have mainly to do with post-processing flexibility, the question arises: do RAW pictures actually look better than JPEG files? On paper, RAWs should for one big reason: they are uncompressed, which is a fancy way of saying that a RAW file is raw data as captured by the camera that has not been processed in any way, which means 100% data retention. In contrast, JPEGs have been run through an in-camera Photoshop of sorts before they even hit the memory card. Want proof of data loss? Just look at the size of a RAW and JPEG file. On my 8Mp Canon 30D, RAWs are typically around 15MB while JPEGs are around 3MB.

But does the large file size mean better image quality?

Yes and no. On the Canon 30D, picture quality is identical at base ISO levels of 100-400. Split pixels as you may, even the most ardent pixel peeper would be hard pressed to find any differences in image quality with regards to color rendition and noise, the pictures are just plain identical. In summary, at low ISOs, RAW and JPEG are equal in terms of technical image quality.
ISO 100: no difference

ISO 200: no difference


ISO 400: still no difference


Moving up the ISO scale, the differences start to appear.

At ISO 800, the effects of noise reduction starts appearing. On the house, the ridges of paint left by the artist's knife are starting to look a little blurred and the smearing of the canvas detail and brush strokes in the trees is noticeable. Also, this is more a point of debate at this time, the colors in the OOC JPEG file seem slightly less vivid than those converted from the RAW. However, bu ISO 1600, all the doubts about color rendition are no longer questions but fact, the colors have a lot less punch to them in the OOC JPEG as compared to the RAW. Also, in the OOC JPEG, the fine details are undoubtedly being smeared away at this point, which is the camera's top native ISO setting (the 3200 setting in the 30D is a boost). Yes, not all is rosy in the RAW file, either, as the grain is very obvious. However, with all that grain comes fine details that the camera has arbitrarily decided to destroy in JPEG. It doesn't take a genius to figure out that it is impossible to put details into a picture with post-processing that were never captured in the first place.

ISO 800: slight softening of the JPEG


ISO 1600: Obvious loss of detail in the JPEG

So what does this all mean?

First of all, at low ISO settings with noise reduction set to normal default, image quality between RAW and JPEG is indistinguishable, with the only RAW advantage being in post-processing. Moving up to mid ISOs, noise reduction will start to creep in, blurring the graininess, and all-important fine details at the same time, resulting in pictures of lower quality. Now, in the case of the 30D, this point is somewhere between ISO 400 and 800, (no, I don't have time to test the 1/3 stop ISO increments), your camera may differ, so it's important to play around with it to see at what point image degradation from noise reduction becomes unacceptable to you. However, at top ISO settings, OOC JPEG files from all cameras are sure to stink as the noise reduction becomes more and more apparent as the ISO is increased. In this vein, you should see why cameras have native ISO ranges and boosts afterward: the boost ISOs stink for pure image quality.

Recommendations? RAW is great in that it allows easy, click a button and forget it post-processing while JPEGs do not. So, if you're confident of your ability to get on the spot results, especially in regards to the all-important white balance (if you screw up your white balance, go here for tips on how to fix your pictures), save some memory card and hard drive space by shooting JPEG in well-lit settings as no one will be able to tell the difference. Shooting in low light? Well, the trade-offs have been explained quite thoroughly, so you make the call there.


Round 2: P&S vs. dSLR
Like with the question of RAW vs. JPEG, all one has to do is go browsing around an online photography forum to see the whole debate of whether P&S cameras can take good pictures take on some serious passion not imaginable to anyone who does not enjoy taking pictures. Yes, it is a given fact that dSLRs can produce pictures of far higher image quality than point and shoots, but is the dSLR advantage overblown or in proportion to the facts? Let's see!


Different sensor sizes + same Mp count = different-sized pixels.

The whole reason dSLRs and P&S cams produce such different pictures lies with the sensors they use: big ones for dSLRs and tiny ones for P&S models. Most dSLRs feature what is called an APS-C sensor, which measures around 24x18mm in regards to width by height, however, there are both larger and smaller sensors, too. On the P&S front, sensors are a lot smaller, just a few millimeters in width. The problem arises when considering the pixel density of the sensor, which is just a fancy term for answering the question of how many pixels you can jam into a given area. Obviously, if you have a pair of 15 million pixels (MP) sensors, one being a big dSLR sensor and the other being a tiny P&S one, the only way to get equal amounts of pixels into areas of different sizes is to change the size of the pixels. Result: P&S cams have high-density sensors loaded with tiny pixels while dSLRs have low density sensors with big pixels.

Herein arises the problem.

All electronic devices produce background noise, camera sensors included. The problem with pixels of different sizes comes in the ability/inability of the sensor to capture enough light in order to drown out the noise. Not being scientific, let's say we have two hypothetical sensors: a dSLR and a P&S one, the dSLR can capture 100 units of light while the P&S can only capture 25 units and they both have the same inherent noise levels. At ISO 100, let's say that both sensors have 2 units of noise. Now, whether it be the 100 units of light on the dSLR or the 25 on the P&S, the noise will be well drowned out by what is called the signal. Now, up the ISO to 3200 and both sensors are producing 20 units of noise. Now, the problem with the P&S becomes obvious, while 100 units of signal vs. 20 of noise are still no big problem for the dSLR, the ratio of 20 noise to 25 signal in the P&S means that there is barely any signal left to overcome the noise. Result: grainy picture ion P&S cams at high ISO.

So, let's examine the situation with pictures.

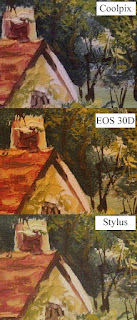
In this test, I used the same Canon 30D dSLR (8Mp) and a pair of P&S cams: a Nikon Coolpix s550 and an Olympus Stylus 550WP, both of which are 10Mp models. To get pictures equal in the crops, I downsized the 10Mp P&S images top the equivalent of 8Mp and then started taking the big crops. For the P&S cams, doing this actually makes them look better than what they are at full resolution, which means a slight handicap in favor of the P&S models right out of the gate. That catch aside, let's examine the results.


At base ISO of 100, all three cameras are looking great, producing vivid colors and crisp details in their images. In fact, it is interesting to look at the Nikon because, with the very aggressive sharpening, it actually produces the best looking image of the three by virtue of the fine detail it renders.


Upping the ISO to 200, the difference in picture quality starts to appear. While the image produced by the 30D and its big sensor looks the same as it did at ISO 100, the P&S images start to look different in their own ways. First up, the Nikon. Remember all of those razor-sharp details that made the ISO 100 image from the Coolpix look the best of the three? Well, they're gone, the Coolpix is already softer in appearance. Onto the Stylus, while the details look about the same, the color rendition suffers as the picture has a slightly washed-out look to it when compared to the ISO 100 shot.


Boosting the ISO to 400, the 30D still looks the same as it did at ISO 100. Unfortunately, the image degradation in the P&S cameras starts to become more and more obvious. On the Coolpix, the fine details are noticeably absent, look at the fine textures to see the effect of noise reduction. Onto the Stylus, the images are also getting softer, but even worse, the color rendition starts to take a dive, especially in the dark shades of foliage.


Upping the ISO again to 800 only makes things much worse, except for the 30D, which is still looking pretty darn good. The Nikon and Olympus? Not so good. The Nikon shows a very dramatic drop in detail retention at ISO 800, which basically cuts the line at 400 being the top setting for usable results as anything higher looks like mush. The color starts to take a dive here as well. On the Olympus, the color quality hasn't taken a dive, but, just like the Nikon, the detail retention, which was already on the mushy side at 400, takes a major hit by 800.


Topping out at ISO 1600, the cameras are all taking hits in their image quality yet again, even the seemingly untouchable 30D, which is now showing some softening of the fine details and a slight drop in color rendition. With the Nikon, the fine details are gone, as is the good color rendition, with the dark areas being especially prone to graininess that is so severe that it looks as though salt was sprinkled all over the picture. On the Olympus, ISO 1600 brings another dramatic drop in color rendition and another great step backward in terms of detail retention. The sensor has gotten so noisy that, even with the camera's heavy-handed approach to eliminating the grain, the picture is now extremely coarse-looking

What does this mean?

First, the assumption that P&S cameras can't keep up with dSLRs is true at anything but the lowest ISO settings, namely 100-200. At base ISO, point and shoots can produce tremendous pictures, with the Coolpix being arguably better than the 30D at ISO 100 and the Stylus every bit as good. However, in anything but ideal light that allows using of low ISO, the dSLRs will start to pull ahead thanks to their big pixels, which gather a lot of light that then can drown out background noise far better than the tiny P&S pixels. As the ISO increases, the dSLRs will widen the image quality gap on their P&S competitors.

Recommendations? If image quality is your thing and you expect to be doing a lot of outdoor photography in good light, a P&S camera will more than suffice. Much smaller than a dSLR, the P&S will go in your pocket while the dSLR will result in sore neck or having to carry a bag around wherever you go. However, if frequent low light shooting is your thing, it's no contest: get a dSLR because, despite its bulkiness, it will deliver the goods in terms of image quality a lot longer than a P&S can.


The Complete Picture
Until now, all you've been getting are single comparisons at a given ISO between the three cameras tested. Below are combination pictures taken from crops of each camera at ISOs ranging from 100-1600.

Canon EOS 30D


Nikon Coolpix s550


Olympus Stylus 550WP


Like What You Just Read?

Why not check out other great stuff about photography, astronomy, associated gear, and how to use it.

Think someone else would find this informative (or at least entertaining)? Use the buttons below to share!


Sunday, November 21, 2010

Examiner for the Week of 11/14, Other Updates

Another wek, another examiner roundup.

Astronomy
The Leonid Meteor Shower
Listen to the Leonids
How to avoid buying a junk telescope
Incredible new photos from pace, where have the dark skies gone?

Photography
High-speed cameras reveal physics of how cats drink
Consumer Reports is looking out for you
Park like an idiot? The whole world may soon be laughing at you!
Security may 'touch your junk' for refusing full body scans
Government responds to full body scanner controversy
The government is storing full body scanner images
Want to protect your valuables on a flight? Pack a gun
Local ex-councilman arrested for taking pictures


New Photos (sort of)


I went digging through old photos on the computer and found a couple that escaped attention when I originally did the astrophoto galleries, so here they are now:

Full Moon and Venus photos added to August gallery

Cool contrails added to September


Page Updates

October's photos can now be found under the Astrophotography Gallery

The Messier Object Gallery has been updated with October's photos, too.


Humble thanks and requests:

If you clicked on any of the above Examiner articles, you're helping me pay my bills. Thank you!

Know someone who misses my stuff or you think would find it interesting? Spread the word!

Like this, why not
follow this blog
?

Thursday, November 18, 2010

October 2010 Astrophotography

Here they are, the astrophotos for October 2010, including many of Comet Hartley, Enjoy.


 Comet Hartley meets the Double Cluster.


Comet Hartley mid-October


Comet Hartley approaches the Double Cluster, 100mm lens


Comet Hartley mid October, 100mm lens


The Flame and Horsehead Nebulae in Orion


M36 in Auriga


M38 and a neighboring NGC in Auriga


M34 in Perseus


Humble requests:


If you found this informative (or at least entertaining), help me pay my bills and check out my Examiner pages for photography and astronomy for more great stuff.

Think this was cool? Why not tell a friend?

For something even better, become a follower.

Wednesday, November 17, 2010

Messier List Updated

Last week, I created a master list of Messier Objects witht he promise that thete would soon be links to photos populating the list. Well, the first round of links have vbeen posted for over 3 dozen of the Messier objects, so why not revisit the list and browse through the photos? Needless to say, as I shoot more 'M' objects, the amount of links on this list will continue to grow, so keep checking back, clicking on the 'educational' page, which is wher the list can be found.


Humble requests:


If you found this informative (or at least entertaining), help me pay my bills and check out my Examiner pages for photography and astronomy for more great stuff.


Think this was cool? Why not tell a friend?


For something even better, become a follower.

Friday, November 12, 2010

Charles Messier and His List of Annoying Objects

18th century French astronomer Charles Messier was a man with a mission: to find comets. More so than now (we have much better optics today), finding a comet was a real big deal in the early part of the telescope era. For some countries, having a long list of comet discoveries was a direct measure of a nation's scientific achievement. Needless to say, the more comets discovered by a country's astronomers, the better.

For the French, Charles Messier was one of their star comet finders. During his career, Messier found 13 comets. His record of discovery was more amazing given the primitive sate of telescope optics at the time. However, as good of an astronomer as Messier was, he wasn't perfect.
Throughout his years of observing, Messier found himself coming across objects that looked like comets but stayed stationary in the sky, which told him that these objects, whatever they were, were not comets. In time, Messier got so annoyed with these troublesome comet look-alikes that he started making a list of them. In time, Messier would catalog over 100 objects that looked like, but weren't comets.
How ironic that today that, rather than look for comets, most astronomers spend time looking at Messier's list of annoying objects.


The Grand List of Messier Objects.

Below is the list of Messier objects, with a small description and where they are located and in what season they are best seen. Messier objects in blue are linked to a photo. As I shoot more “M” objects, more objects will have links. Who knows, if I get really ambitious, they may get their own pages with pictures and observing info.

NOTE: When describing what these objects look like in telescopes, using a mid-sized scope 4” refractor, 6” reflector as a basis, with 40x being low, 100x being mid, and 200x high-power.

M1 (Crab Nebula), winter, located in Cancer, 9th magnitude remnant of the supernova seen in 1054. Small, dim smudge in scopes.

M2, fall, 7th magnitude globular cluster in Aquarius, medium-sized cluster in area, relatively high surface brightness.

M3, spring, 7th magnitude globular Cluster technically in Coma Bernices, but often found by star hopping from Arcturus, medium-sized with medium surface brightness

M4, summer, 7th magnitude globular cluster in Scorpius less than a degree from Antares, large in area with low surface brightness owning to its diffuse (for a globular) nature

M5, summer, 7th magnitude globular cluster in Serpens, large in area and medium in surface brightness, one of the sky's best globular clusters

M6 (Ptolemy's Cluster), summer, 4th magnitude open cluster just off the Scorpion's stinger, large in area and best seen in binoculars or extreme low power telescope eyepieces

M7 (Butterfly Cluster), summer, 5th magnitude open cluster in Scorpius just off the scorpion's stinger, best in scopes at low power, nice in binoculars, too.

M8 (Lagoon Nebula), summer, 5th magnitude nebula with open cluster in Sagittarius just above the Teapot's spout, a great low power telescope object, nice in binoculars from dark skies, too. Gas cloud shape is obvious in scopes.

M9, summer, 9th magnitude globular cluster in Ophiuchus

M10, summer, 7th magnitude globular cluster in Ophiuchus

M11 (Wild Duck Cluster), summer, 6th magnitude, tight open cluster technically in Scutum, but easily found just off of Aquila's tail, best at low to medium power. A beautiful splash of blue stars, this is a deep sky favorite for many

M12, summer, 8th magnitude globular cluster in Ophiuchus

M13 (Great Hercules Cluster), summer, 5th magnitude globular cluster with large area and medium surface brightness within the Keystone, widely considered the best globular in the mid-Northern sky, pick your power!

M14, summer 9th magnitude globular cluster in Ophiuchus

M15, summer, 7th magnitude globular cluster in Pegasus, find it by star hopping off the nose of the horse. Very similar to M2 in appearance. Medium power is best.

M16 (Eagle Nebula), summer, 6th magnitude nebula with open cluster about half way between the top of the Teapot and end of Aquila's tail. Faint nebulosity in scopes, the cluster is more conspicuous. Use low power.

M17 (Omega/Swan Nebula), summer, 6th magnitude, aptly named, this small but high-surface brightness nebula looks like what its name suggests. Located about half way between the top of the Teapot and end of Aquila's tail. Use low to medium power.

M18, 8th magnitude open cluster in Sagittarius

M19, 8th magnitude globular cluster in Ophiuchus

M20 (Trifid Nebula), summer, 6th magnitude, to find the Trifid by coming up a degree off the tip of the Lagoon. Seen as a round, hazy patch in small scopes, from a dark sky sight, it can also be good in binoculars.

M21, summer, 6th magnitude, small open cluster just above and left of the Trifid consisting of around two dozen stars is often, and unfortunately ignored in the wake of its nebular neighbor. Easily fits in a low power field with the Trifid.

M22, summer, 5th magnitude globular cluster located about 3 degrees left of the top of the Teapot's lid. Large in surface area, medium in brightness, this would undoubtedly rival M13 for best Northern globular if it wasn't located in the heart of the Milky Way. Pick your power.

M23, 6th magnitude open cluster in Sagittarius

M24, 4th magnitude star cloud in Sagittarius

M25, summer, 6th magnitude open cluster located about 5 degrees left and 5 degrees up from the top of the Teapot's lid. A nice splash of gold and blue stars in low power telescopic fields.

M26, 9th magnitude open cluster in Scutum

M27 (Dumbbell Nebula), summer, 7th magnitude, located just off the tip of Saggita, the aptly-named nebula is easy to find. Smallish in area but with high surface brightness, low to medium power views are the most pleasing and best reveal this nebula's distinctive shape.

M28, summer, 8th magnitude, a tiny globular cluster located almost on top of the star that makes the pinnacle of the teapot's lid, the small, low surface brightness globular cluster is one of the easiest deep sky objects in the sky to find.

M29, 9th magnitude open cluster in Cygnus

M30, 8th magnitude globular cluster in Capricorn

M31 (Great Andromeda Galaxy) fall, 3rd magnitude, located by star hopping two stars left and two up from third base on the Great Square, one can't help but miss the Andromeda Galaxy, which reveals itself as a distinct oval patch in binoculars and in scopes at low power. For the average person, this is also the most distant object that can be seen with the naked eye.

M32, 10th magnitude dwarf elliptical galaxy, a satellite of M31

M33 (Triangulum Galaxy), fall, 6th magnitude, found by star hopping two left from third base and then down about 5 degrees, this spiral galaxy is large but has extremely low surface brightness, requiring dark skies and/or a large scope. Look for a faint spiral pattern.

M34, fall, 6th magnitude, located about 5 degrees up from Algol, this open cluster is another easy to find object. Best seen at low power in a scope, M34 reveals itself to be a loose cluster of a few dozen blue stars.

M35, winter, 5th magnitude, located at the tip of Castor's foot, it's just about impossible top miss M35, a large, dense open cluster. Low power in a scope will reveal around 100 stars. As an added bonus, look for the tiny NGC open cluster right next to M35 itself.

M36, winter, 6th magnitude, Located in Auriga, the M36 open cluster is easy to sweep up in low power telescopic views, in which it is best seen. Medium tightness cluster composed of blue stars set against a somewhat dense stellar background.
M37, winter, 6th magnitude, located just below Auriga, the M37 open cluster is widely considered to be the jewel of the Auriga Trio. At low power, the large cluster transforms from hazy patch into medium-sized, somewhat on the tight side grouping of stars.

M38, winter, 7th magnitude, located in Auriga, M38 is somewhat difficult to pass by at low telescopic power because it is made up of a rather dense collection of several dozen stars. Try and visually spot its neighboring NCG open cluster, too!

M39, 5th magnitude open cluster in Cygnus

M40, 9th magnitude, a Messier mistake, a double star in Ursa Major

M41, winter, 4th magnitude open cluster, to find, drop down a few degrees from impossible to miss Sirius, the brightest star in the sky. At low to medium power in a telescope, the medium-sized cluster reveals itself to be composed of a few dozen deep blue stars.

M42 (Great Orion Nebula), winter, 4th magnitude, impossible to miss, just look for the hazy patch in Orion's Sword to find M42, the brightest nebula in the sky. At low power, see how far you can follow the glowing gas filaments. At high power, see how many stars you can split in the Trapezium.

M43, winter, 7th magnitude, a sub nebula of M42, this could really be called M42A

M44 (Beehive Cluster), winter, 5th magnitude, find M44 by finding the center of Cancer and looking for the sprinkling of stars. The second largest open cluster after the Pleiades, M44 is great in both scopes at low power and in binoculars.

M45 (The 7 Sisters/Pleiades), winter, 1st magnitude, the largest open cluster in the sky, the Pleiades are spectacular in both scopes and binoculars, revealing itself to be a lot more than the legendary 7 sisters! The cluster is the large, hazy patch seen with the naked eye below the feet of Perseus.

M46, winter, 6th magnitude open cluster in Puppis

M47, winter, 4th magnitude open cluster in Puppis

M48, spring, 5th magnitude open cluster in Hydra

M49, spring, 10th magnitude galaxy in Virgo

M50, winter, 7th magnitude open cluster in Monoceros

M51 (Whirlpool Galaxy), spring, 8th magnitude, one of the most spectacular and nearest galaxies, find the Whirlpool by dropping about 2 degrees down from the end of the Big Dipper's handle. Large but with low surface brightness, a low power eyepiece should reveal a distinct spiral along with a companion galaxy.

M52, fall, 8th magnitude open cluster in Cassiopeia, lots of blue stars of rather low brightness, large in area, find it by star hopping off the tall side of the 'W.'

M53, spring, 8th magnitude globular cluster in Coma Berenices

M54, summer, 8th magnitude globular cluster in Sagittarius

M55, summer, 7th magnitude globular cluster in Sagittarius

M56, summer, 9th magnitude, a small globular cluster in Lyra, find M56 by stopping about half way between the bottom star of Lyra and Alberio, the head of Cygnus. To see any appreciable detail, you'll need mid to high telescopic powers.

M57 (Ring Nebula), summer, 8th magnitude, a cool, appropriately named planetary nebula, find the Ring by parking your scope directly between the bottom stars of Lyra. Extremely small but of high surface brightness, use mid to high power to resolve the cosmic donut.

M58, spring, 11th magnitude galaxy in Virgo

M59, spring, 11th magnitude galaxy in Virgo

M60, spring, 10th magnitude galaxy in Virgo

M61, spring, 10th magnitude galaxy in Virgo

M62, summer, 8th magnitude globular cluster in Ophiuchus

M63, (Sunflower Galaxy), spring, 8th magnitude galaxy in Canes Venatici

M64 (Black Eye Galaxy), spring, 9th magnitude, seen at low power, the galaxy lives up to its name as it features a dark spot among its otherwise medium bright body.

M65, spring, 10th magnitude, edge-on galaxy that is part of the famous Leo Trio, find M65 by coming about 5 degrees down from Denebola in the back of Leo the Lion.

M66 spring, 10th magnitude galaxy that is part of the famous Leo Trio. Positioned at about the same angle as Andromeda, find M66 by coming about 5 degrees down from Denebola in the back of Leo..

M67, winter, 7th magnitude open cluster in Cancer

M68, spring, 9th magnitude globular cluster in Hydra

M69, summer, 9th magnitude globular cluster in Sagittarius

M70, summer, 9th magnitude globular cluster in Sagittarius

M71-summer, 8th magnitude, a medium-sized globular cluster with low surface brightness, find M71 by dropping a degree from the shaft of Saggita. Kick up the power to medium to get some detail.

M72, fall, 10th magnitude globular cluster in Aquarius

M73, fall, 9th magnitude Messier mistake, a group of stars

M74, fall, 10th magnitude galaxy in Pisces

M75, summer, 9th magnitude globular cluster in Sagittarius

M76 (Little Dumbbell Nebula), fall, 10th magnitude nebula in Perseus. Very small and dim, use medium to high power to pick up the faint smudge almost to the last star in Andromeda's top row.

M77, fall, 10th magnitude galaxy in Cetus

M78 (Flame Nebula), winter, 8th magnitude nebula in Orion located just above the lowest belt star. Very diffuse in nature, you'll need a dark sk and/or big scope to see any nebulosity.

M79, winter, 8th magnitude globular cluster in Lepus

M80, 8th magnitude globular cluster in Scorpius

M81 (Bode's Galaxy), spring, 6th magnitude, a largish spiral galaxy located off of the Big Dipper's bowl, this galaxy exists in a bit of a void, making it a bit hard to find. However, searches will be rewarded as an unmistakable spiral shape will be seen in scopes at low power. See if you can fit the Cigar (M82) in the same field.

M82 (Cigar Galaxy), spring, 9th magnitude, an edge-on spiral galaxy located off the Big Dipper's bowl, it may take a bit of looking to find this cosmic cancer stick. However, because of its high surface brightness, once found, the galaxy is impossible to miss. See if you can fit Bode in the same field of view.

M83, spring, 8th magnitude galaxy in Hydra

M84, spring, 11th magnitude galaxy in Virgo

M85, spring, 10th magnitude galaxy in Coma Berenices

M86, spring, 11th magnitude galaxy in Virgo

M87, spring, 11th magnitude galaxy in Virgo

M88, spring, 11th magnitude galaxy in Coma Berenices

M89, spring, 11th magnitude galaxy in Virgo

M90, spring, 11th magnitude galaxy in Virgo

M91, spring, 11th magnitude galaxy in Coma Berenices

M92, summer, 7th magnitude globular cluster in Hercules. Small but with high surface brightness, M92, a spectacular globular in itself is, often overlooked in favor of M13. Star hop off the top of the Keystone to find this one.

M93, winter, 4th magnitude open cluster in Puppis

M94, spring, 9th magnitude, a small spiral galaxy easily found by splitting the stars of Canes Venetici and dropping down about 3 degrees. Small but with high surface brightness, this tiny galaxy actually resembles an out of focus globular cluster at first glance.

M95, spring, 11th magnitude galaxy in Leo

M96, spring, 10th magnitude galaxy in Leo

M97 (Owl Nebula), spring, 9th magnitude nebula in Ursa Major. Very easy to find off of the Dipper's bowl, the Owl is hard to see because of its low surface brightness.

M98, spring, 11th magnitude galaxy in Coma Berenices

M99, spring, 10th magnitude galaxy in Coma Berenices

M100, spring, 10th magnitude galaxy in Coma Berenices

M101 (Pinwheel Galaxy), winter, 8th magnitude, a large spiral galaxy, find the Pinwheel by splitting the last two stars in the Big Dipper's handle and then moving up about 5 degrees. Large but with extremely low surface brightness, the Pinwheel requires a large scope and/or dark sky to make out its swirl pattern.

M102, the mystery Messier, no clear opinion on what Messier was writing about with this one

M103, fall, 7th magnitude open cluster in Cassiopeia. Easy to find just off the 'W,' M102 is a rather small, tight collection of mostly dim stars wit ha few bright ones thrown in, too.

M104 (Sombrero Galaxy), spring, 9th magnitude, the aptly-named Sombrero is found by star hopping off the top left of Corvus, first to a knot of stars, up to an arrow of stars, and then follow the arrow to the galaxy. Seen at low power in a scope, the edge-on, small, but high surface brightness spiral galaxy lives up to its name and is a favorite to many.

M105, spring, 10th magnitude galaxy in Leo

M106, spring, 11th magnitude galaxy in Canes Venatici

M107, summer, 10th magnitude globular cluster in Ophiuchus

M108, spring, 11th magnitude galaxy in Ursa Major

M109, spring 10th magnitude galaxy in Ursa major

M110, fall, 10th magnitude galaxy in Andromeda, the other M31 satellite

“Should have been M111” Frankly, I have no idea how Charles Messier (or one of his object-feeding contemporaries) missed the Double Cluster in Perseus. A fall object located about half way between the head of the hero and Cassiopeia, the twin open clusters of mostly blue (and a few orange) stars are easily seen in binoculars, but look a whole lot better in telescopes used at low power.


Like What You Just Read?

Why not check out other great stuff about photography, astronomy, associated gear, and how to use it.

Think someone else would find this informative (or at least entertaining)? Use the buttons below to share!


Wednesday, November 10, 2010

September 2010 Astrophotography

Yes, late again and for just two pictures, butthere is good news: October's astrophotos (including several of Comet Hartley) are just about done and should be appearing within a week. 

 M71 globular cluster in Saggita.

The Pleiades (M45)


Not astronomical ser se, but just look at the 3D nature of those contrails!


Humble requests:
*If you found this informative (or at least entertaining), help me pay my bills and check out my Examiner pages for photography and astronomy for more great stuff.

*Think this was cool? Why not tell a friend?

*For something even better, become a follower.

Sunday, November 7, 2010

Examiner for Last 2 Weeks

Well, on account of my History of Ghost Photography article on Halloween (last Sunday), there was no Examiner update. This week makes up for it as there are two weeks worth of links to catch up on. So, if you missed anything, start clicking away!

Astronomy
The diving Dipper
See the International Space Station
Could Comet Hartley produce a meteor shower?
See the most intense storm in U.S. History-from space!
Asteroid to fly by Earth, see it tonight!
The comet that looks like a pickle
Featured sight for week of 10/31: the spring sky
The November Sky
Local astronomy events for November
'Big science' and the election
Cleveland weather for November
Comet Hartley's close up
NASA Glenn Center sent to lockdown after drill gone wrong
Discovery launch delayed until November 30


Photography
The 7 degrees of digital camera
Katy Perry wedding creates buzz
How to tell if your new lens is a lemon
Stars fight Photoshop
Errant hockey puck smashes camera
New anti-sexting app lets parents keep tabs on kids' phones
Time traveler caught on camera?
Imaging Resource posts real Nikon D7000 samples
Canon Powershot s95: the perfect pocket cam?
Cleveland's Franklin Castle: one of America's most haunted houses
Win big with your Halloween pictures
Canon to play Scrooge this Christmas
Do the best gifts come in open boxes?
Introducing the Jerkstopper
Pentax K-5 smokes the competition


Humble thanks and requests:


If you clicked on any of the above Examiner articles, you're helping me pay my bills. Thank you!

Know someone who misses my stuff or you think would find it interesting? Spread the word!

Like this, why not follow this blog?

Saturday, November 6, 2010

Don't Forget to Fall Back Tonight!

It's the first weekend of November, which means that it's time to fall back for those of us living in the United States. While most people are happy for an extra hour of sleep on this one night, for us astronomers, there are perks to Standard Time that are much more far-reaching, such as earlier bnights, a a last chance to see the summer sky, and not having to stay up so late for a winter preview. So, don't forhet to set your clocks back before you go to bed tonight.

So, as daylight Savings Time ends, why not learn a little with some trivia? Enjoy!

* Many ancient civilizations divided their days into 24 hours just like us, but adjusted the hours'
lengths so that there would always be 12 hours of day and 12 of night.

* While he did not propose DST, Benjamin Franklin, while serving as envoy to France,
anonymously published a letter suggesting people rise early (and thus go to bed earlier) to
economize on candles and make use of natural sunlight.

* DST was actually proposed by New Zealand entomologist George Vernon Hudson, who
suggested a two hour daylight savings shift.

* English outdoorsman/builder William Willet also proposed the idea simultaneously. He
suggested advancing the clock during the summer months only

* Both Hudson and Willet had personal stakes in seeing more daylight: Hudson found that
extended time at night would allow more time to collect specimens. Willet hated having to cut
short his golf rounds and see many Londoners sleep through most of the mornings

* In WWI, the Central Powers (Germany, Austria-Hungary, and allies) were the first to use DST
as a coal-saving measure in 1916. England and many allies quickly followed suit. Russia
started using DST in 1917 and the United States adopted the idea in 1918.

* While we shift by an hour today, twenty and thirty minute shifts, and also two hour shifts, have
been used in the past

* Even now, start/end dates aren't standard around the world

* Switch dates are reversed in the Southern Hemisphere

* In some areas, voters have rejected use of DST altogether while in other areas, there are pushes
to eliminate Standard Time and have DST all year long.


Humble requests:

* If you found this informative (or at least entertaining), help me pay my bills and check out my Examiner pages for photography and astronomy for more great stuff.

*Think this was cool? Why not tell a friend?

* For something even better, become a follower.